The goal of this lab is to understand the architecture and key data structures in Webots and how to access them from Python. You will augment a manipulating arm with a 3D camera and implement a simple state machine in Python to grasp a can using a distance sensor.
Specific goals:
- understand the Webots timestep
- understand Webots simulation speed
- discover the Webots Python API
- learn how to setup an external controller
- search pertinent information in a sensor datasheet
Installation
Webots is available as binary for Windows, Linux and Mac from www.cyberbotics.com. You will need to install a python interpreter and setup Webots to use it. You can set the Python interpreter that Webots actually uses in “Webots -> Preferences”. This is important if you have multiple installations of Python on your machine. Make sure you inclue the full path. This will allow you to run Python scripts in the built-in IDE. We will use an external controller for most of this class.
Overview
Use “Open Sample World” from the File menu, select “robots” and then “Universal Robots”. You should see a factory with a UR3, a UR5 and a UR10 picking up Coca Cola cans.
Webots is a “full-physics” simulator. When opening the software, you see the world containing the robots and objects in the center. The “Scene tree” to the left, and the controller code to the right. Webots simulates full physics using the ODE library. It does this in discrete steps by simulating what happens within the next few milliseconds. This value is defined in the Scene Tree in the “WorldInfo” node, and in “basicTimeStep” therein.
Exercise 1: Webots time step
- Run the simulation in “fast” mode (the “fast forward” button right of the play button). Note the “speed-up factor” you are getting. (You will need to save the world in one of your own directories and restart the simulation after changes made).
- Increase the time-step in the scene tree, e.g. from 8 to 80 and then 160. What happens to your speed-up? Why?
- How far can you increase the time-step before things break? Why?
- You can also advance the simulation step by step using the button left of the play button. Inspect the controller code in the window to the right. Can you find the piece of code that advances the simulation by one step? What is the time step the simulator uses?
- Think about which time step should be smaller (or at least equal), the world time step or the simulator time step
Note: Once the world has been simulated, small errors are building up, changing the coordinate axes of all the objects in the world. This is a side-effect of the ODE numerical solver. You should therefore never save a world once it has run. Always use the “revert” button (next to the “save” icon) or the “reverse” button to reset the simulator before changing any parameters. It is now a good time to save the sample world as your own world. You can delete the UR3 and UR10 robots to speed up the simulation.
Programming the robot(s)
Webots allows you to define robots in the scene tree. You can either construct your robot from basic building blocks such as links and joints or use ready-made building blocks. All sensors and actuators can be accessed in Webots via their “name” string. If you use ready-made prototypes such as the UR5e, you cannot really see the components that it is made off. Right click on the UR5e in the scene tree and select “View PROTO Source” to understand how the robot is structured. Try to match the different sensors and actuators that are accessed in the C-code in the source file. In Python, the robot.getDevice function returns a Python class for each object. You can use the Webots reference to find out what the member functions of each object are.
Exercise 2: Your first Python controller
- Go to “Wizards” in the Webots Menu, and select “New Robot Controller…” and create a Python controller
- Navigate in the scene tree to the UR5e’s controller parameter and press “Select…”. Your controller should show up in the list.
- Use the hints in the Python controller skeleton and the Webots reference manual to replicate the C-controller in Python
- You can run your controller from within Webots.
Run an external controller
Most often, we are interested in running the controller in its own Kernel to faciliate debugging.
- In order to use an external controller, select “<extern>” from the list of controllers
- Follow the instructions on https://www.cyberbotics.com/doc/guide/running-extern-robot-controllers to setup environment variables that allow your Python interpreter to find the Webots libraries and connect to the Webots controller
- Run your controller in a terminal, Jupyter Lab, Visual Studio or any other IDE that you are comfortable with
- You can store all the commands that are needed in a file and then run them by typing “source
"
Creating your own robot
- Inspect the “toolSlot” of your UR5e and zoom in onto the UR5e’s end-effector. If you cannot see the distance sensor, select “Show DistanceSensor Rays” from “Optional Rendering” in the “View” menu.
- The distance sensor does its job here, but is very limited. For example, you wouldn’t be able to find an object. We will install an RGB-D camera instead.
- To add something to the scene tree, select the “toolSlot” and press the “+” button in the upper left.
Our goal is to provide the robot with the equivalent of an Intel RealSense D435. This camera can be modeled by a “RangeFinder” from the base nodes and a “Camera”. Make sure you revert the world before adding anything, as you can otherwise not save.
- First, add a RangeFinder node and enable “Show RangeFinder Frustrums”. You will need to adjust the rotation of the device so that the device can see what is inside the robot’s palm. You will need to rotate by Pi/2 around the z-axis.
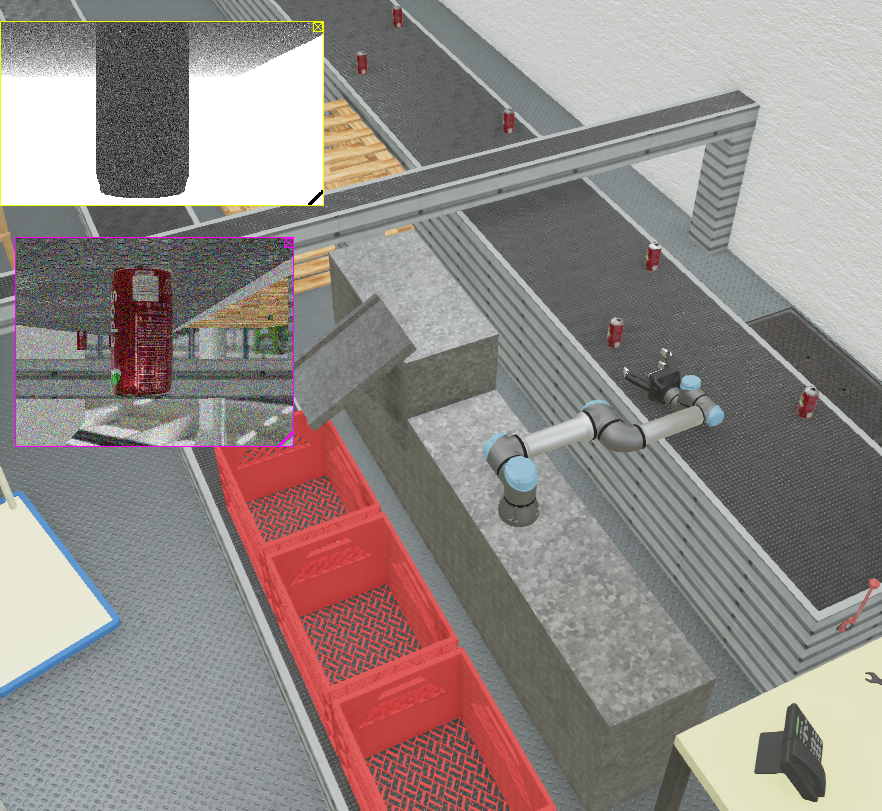
- Save your world, and run the simulation. You should see the range finder in the top left. If you don’t, use the “Overlays” menu to enable it. It currently is black? Why do you think that is?
- Change the translation of the range finder to position it just above the Robotiq hand’s palm. This wasn’t the reason, the image is black. You need to first turn the sensor on. This is important, as Webots does not do unnecessary computations for sensors that are turned off.
- Find a way to enable the sensor in your Python code using the reference manual and run your simulation.
- Do the same for the RGB camera. Note that the camera is an extra device and also needs to be enabled separately.
- You can now change the resolution and update frequency (timestep) to match that of the Intel RealSense D435. Download the datasheet and find out. Attention: the maximum resolution depends on the minimum range that the camera can operate at. For manipulation, we want to use the device at the closest possible range!
- Webots can also simulate noise. In this class, we will use the range sensor with “noise” set to 0.1 and the minimum range (“minRange”) set to 0.1- Webots can also simulate noise. In this class, we will use the range sensor with “noise” set to 0.1 and the minimum range (“minRange”) set to 0.11. Set these values, and observe the result!
Deliverables
- The deliverable for this lab is a functioning Webots controller in Python (“.py”) controller
- The controller must have the same functionality as the original C controller (grasping the cans using the distance sensor) AND enabling the range finder and camera.
- You will not need to deliver answers to the questions, nor the Webots world itself
- Please submit your .py file to Canvas